
Dominus Gladiatus Staff & Buildings Guide
Dominus Gladiatus staff and buildings guide: Quarters, Infirmary, Palus, Pleasure House, Temple, plus Doctore, Procurator, Venator, Faber and Ordinator.
The BUILD and STAFF tabs are where a Ludus turns coins into time. Buildings remove bottlenecks: Fatigue, injuries, training speed, morale. Staff remove different bottlenecks: training oversight, contracts, exhibitions, equipment protection and market access. Buying the wrong one is the most common way to stall an otherwise healthy run.
Quick answer
Build the Gladiator Quarters first, then the Palus, then the Infirmary if injuries are frequent. Hire the Doctore when training is continuous, the Procurator or Ordinator when income needs a second channel, and the Faber when equipment replacement becomes expensive. Buy the Pleasure House before morale warnings appear, not after.
What buildings should you buy first?
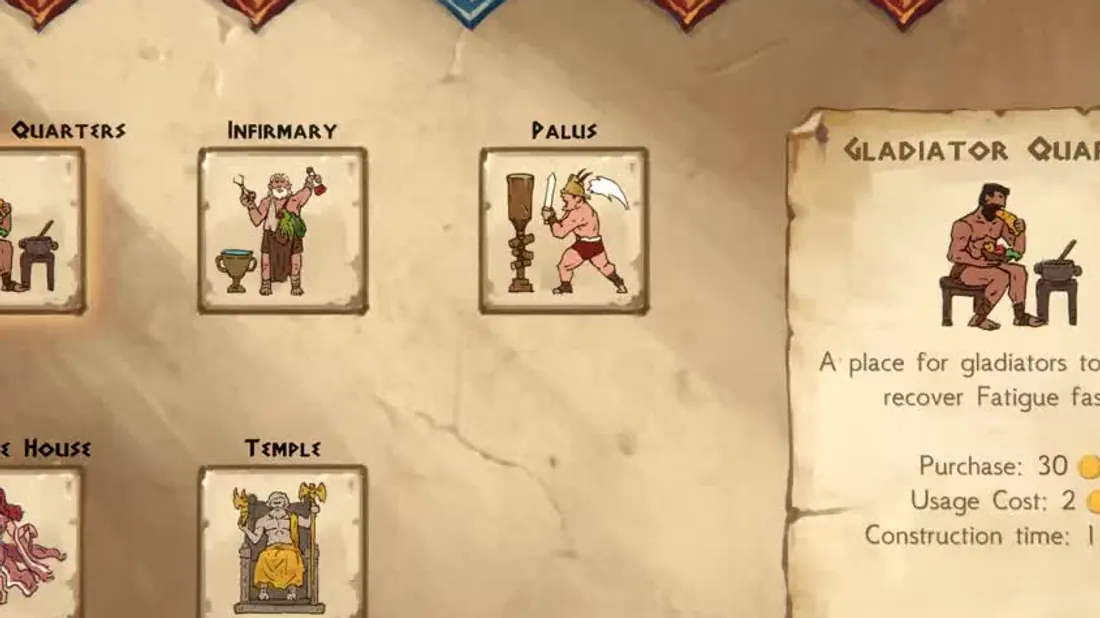
The opening BUILD panel shows five structures. Each has a purchase cost, a usage cost and a construction time.
| Building | Purchase | Usage | What it does | Priority |
|---|---|---|---|---|
| Gladiator Quarters | 30 | 2 | Rest and recover Fatigue faster | 1 |
| Palus | 60 | - | +20% training speed | 2 |
| Infirmary | Varies | Varies | Heal injuries over time | 3 |
| Pleasure House | Varies | Varies | Restore morale | 4 |
| Temple | Varies | Varies | Prayer and morale reset | 5 |
The Quarters and Palus are the opening core because they compound. Faster recovery means more arena days; faster training means higher skill ranks per calendar month. The Infirmary is reactive: buy it when the first injury arrives, not before, unless you already know the roster is fragile.
The Pleasure House and Temple are morale insurance. A death or a bad loss can create a refusal spiral that costs more than either building. Buy the Pleasure House before your first To-the-Death contract, not after.
Official source: Dominus Gladiatus store page ↗
How does the Gladiator Quarters work?
The Quarters costs 30 coins, charges 2 coins per use in the panel I checked, takes one day to build and "allows gladiators to rest and recover Fatigue faster." Patch 5 made its recovery stronger.
Use it after:
- Every loss (+2 Fatigue).
- Every second win (+1 each).
- Any arena entry at Fatigue 2 that you want to reset before the next booking.
The 2-coin usage fee is trivial compared with an Infirmary stay. Do not skip the Quarters to save coins; the injury risk at Fatigue 3+ is the expensive outcome.
Is the Palus worth 60 coins?
Yes, if you plan to train more than two ranks. The Palus raises training speed by 20% and takes one day to build. On a 3-day Combat rank it saves roughly half a day; across a full skill tree it saves multiple purses' worth of calendar time.
Buy it before the second combat skill. Buying a weapon first gives one fighter a small damage spike; the Palus accelerates every fighter you will ever train.
The training guide → covers the stacking with the Doctore and the whip.
When should you build the Infirmary?
Build the Infirmary when the first serious injury lands, or earlier if you are taking To-the-Death contracts. It is the only reliable way to remove injuries; idle time is not a substitute.
The key rule is to finish the stay. Patch 5's early-exit behaviour removes only the injuries covered by the time served and restores Fatigue to its pre-admission value. A partial stay is a partial refund, not a shortcut.
If you are constantly paying for injuries, the problem is upstream: Fatigue management or matchup selection. The Infirmary fixes the symptom, not the cause.
Which staff should you hire first?
The staff panel in the opening build shows seven hires. The verified roles:
- Doctore (80 coins): pushes gladiators to train faster through discipline and the lash. Patch 5 removed the whip's morale penalty and Patch 7 removed the extra training Fatigue.
- Venator (45 coins): sends gladiators into the wild to gather useful commodities. The Hunt Begins achievement is tied to a hunt.
- Procurator: handles contracts; Patch 3 lets the Procurator choose a contract. The A Profitable Journey achievement is tied to sending a gladiator on a contract.
- Ordinator: arranges exhibition matches inside the Ludus, according to Patch 6.
- Faber: protects a gladiator; the Built to Last achievement is tied to using the Faber.
- Slave Trader: lets you hire a Sword for Hire; the Sword for Hire achievement is tied to this.
- Agent: appears in the staff panel; its exact effect was not captured in the build I checked. Read the hire card before spending.
Hire order for most runs:
- Doctore, once training is continuous.
- Procurator or Ordinator, once you need a second income channel.
- Faber, once equipment replacement costs exceed the hire fee.
- Venator, when you want commodity income alongside arena purses.
- Slave Trader and Agent, when the roster and economy are stable.
Do not hire every staff member early. Each hire is a coin sink, and the benefits only matter if the Ludus is already running.
What does the Ordinator add?
Patch 6 added the Ordinator as the staff member who manages Exhibition Matches. Exhibitions are the low-risk income channel: Patch 7 set the base reward at 20 coins plus 3 coins for each arena victory.
The Ordinator is useful when:
- Your main fighters are resting but you still want income.
- A new recruit needs combat experience without a dangerous purse.
- You want to keep the roster sharp between contract batches.
It is not a replacement for real arena purses. A 20-coin exhibition is a top-up, not a business.
What does the Faber protect?
The Faber is an equipment-protection hire. The exact protection mechanics were not exposed in the build I checked, but the achievement "Built to Last" is tied to using the Faber to protect a gladiator.
The economic logic is simple: equipment is lost when a gladiator dies, and high-tier weapons and armour are expensive. If your main fighter is entering To-the-Death bouts, the Faber is insurance against a replacement cost that exceeds the hire fee.
Pair the Faber with a conservative To-the-Death policy. Protection is not a reason to take reckless fights.
How do buildings and staff interact?
The strongest combinations:
- Quarters + Doctore: recovery and training both accelerate, so the calendar produces more usable arena days.
- Palus + Doctore + whip: a short burst of training speed before a key fight.
- Infirmary + Pleasure House: heal the body and the mood after a bad loss.
- Procurator + Ordinator: two income channels, one risky and one safe.
- Faber + high-tier equipment: protect the investment that would be lost on death.
Do not buy a building and a staff member that solve the same bottleneck. If you already have the Palus, the next coin should fix recovery or income, not another training modifier.
A practical purchase sequence
| Stage | Buy | Reason |
|---|---|---|
| Opening | Quarters | Fatigue recovery |
| First income | Palus | Training speed |
| First injury | Infirmary | Healing |
| First stable roster | Doctore | Training acceleration |
| First morale warning | Pleasure House | Refusal prevention |
| First big purse | Faber | Equipment insurance |
| Post-game | Ordinator / Procurator | Contract and exhibition income |
Adjust for your save. The sequence is a default, not a law.
Official source: Dominus Gladiatus achievements ↗
Official source: Steam news ↗
FAQ
Do buildings have upkeep? The panel shows a purchase cost and, for some, a usage cost. The daily Ludus upkeep is separate: 1 coin per day plus 1 per gladiator.
Can I demolish or replace a building? The build panel in the opening does not expose a demolish action. Treat each purchase as permanent for the run.
Is the Temple worth building? It is morale insurance and the source of the Favor of the Gods achievement. Build it when morale is a recurring problem or when you are chasing achievements.
Which staff member makes the most money? The Procurator (contracts) and Ordinator (exhibitions) are the direct income hires. The Doctore is an indirect earner because faster training produces stronger fighters.
More Dominus Gladiatus Guides
A Dominus Gladiatus arena readiness checklist: Fatigue, injuries, Health, morale, crowd, matchup, rules and reserve before you accept a purse.
Dominus Gladiatus best build guide: Health vs damage, skill order for Murmillo, Secutor and Scissor, Veteran bonuses, equipment priorities and team-fight roles.
Dominus Gladiatus best gladiators tier list: Health, talents, temperament and class value, plus when to buy, keep or sell a recruit from the Slave Market.
Dominus Gladiatus class guide: Murmillo, Secutor and Scissor strengths, skill synergies, Retiarius and Hoplomachus matchups, and the best first class.
How crowd favor works in Dominus Gladiatus: Liked, Indifferent and Disliked calls, two calls per fight, stones and food, favored immunity and Ruthless rules.
All six Dominus Gladiatus Domini: Titus Aurelian, Khepri Setekh, Cassius Lysandros, Aurelia Zahara, Livia Calpurnia and Decimus Amborix, powers and counterplay.
Twelve Dominus Gladiatus tips that prevent early run deaths: fatigue management, market discipline, morale warnings, crowd calls and upkeep traps.
How Dominus Gladiatus endgame contracts work after the Grand Tournament: 10-fight batches, 1v1 to 5v5, beast spectacles, rising upkeep and retirement.